Battery switch on travel trailer function is crucial for managing your RV’s power. Understanding how your battery switch works is key to avoiding electrical problems and ensuring a smooth camping experience. This guide breaks down the different types of switches, their functionalities, troubleshooting tips, and important safety precautions. We’ll cover everything from basic operation to advanced upgrades, empowering you to confidently manage your travel trailer’s electrical system.
Whether you’re a seasoned RVer or a newbie, this comprehensive guide will equip you with the knowledge to handle your travel trailer’s battery system with ease. We’ll delve into the intricacies of various switch types, explore their advantages and disadvantages, and provide step-by-step instructions for troubleshooting and maintenance. Get ready to become a power management pro!
Function and Purpose of a Battery Switch
A battery switch is a crucial component in a travel trailer’s electrical system, acting as the central control for power distribution. It allows you to easily disconnect and connect your trailer’s battery, protecting your electrical components and managing power from various sources. Think of it as a master switch for your trailer’s 12-volt system.The primary function of a battery switch is to isolate the trailer’s battery from the rest of the electrical system.
This isolation is vital for safety and prevents unwanted battery drain when the trailer isn’t in use. By switching the battery off, you avoid situations where a faulty appliance or a small drain could completely deplete your battery, leaving you stranded.
Battery Switch Protection of Electrical Components
The battery switch safeguards your trailer’s electrical components from damage caused by overloads or short circuits. If a short circuit occurs in a light, appliance, or wiring, the battery switch can be turned off, isolating the problem and preventing further damage. This prevents potentially costly repairs or even fire hazards. Imagine a situation where a wire shorts near your refrigerator; flipping the battery switch immediately cuts the power, preventing further damage and potential fire.
So, you’re an audiophile who travels? Awesome! Check out this guide on audiophile travel setups for tips on packing your precious gear. It’s crucial to protect your headphones and portable DAC, right? Then, for lighter options and some clever packing hacks, head over to audiophile travel setups – this site has some great ideas for minimizing your kit without sacrificing sound quality.
Remember, a good travel setup means enjoying your favorite tunes wherever you go!
Managing Power from Multiple Sources
A battery switch plays a critical role in managing power from different sources, such as shore power (hookups at campsites), a generator, and the trailer’s battery. When connected to shore power, the battery is often charged while simultaneously powering the trailer’s 12-volt appliances. The switch allows you to use the shore power to charge the battery, and then use the battery power when you are off-grid.
With a generator, the same principle applies; you can charge the battery while running the generator, and then switch to battery power when the generator is off. This flexibility ensures you have power whenever and wherever you need it.
Wiring Diagrams and Schematics
Understanding wiring diagrams is crucial for anyone working on a travel trailer’s electrical system. These diagrams visually represent the electrical pathways, allowing you to trace circuits, identify components, and troubleshoot problems effectively. Without a clear understanding of your trailer’s wiring, attempting repairs can lead to further damage or even create safety hazards.
Simple Travel Trailer Battery System Wiring Diagram
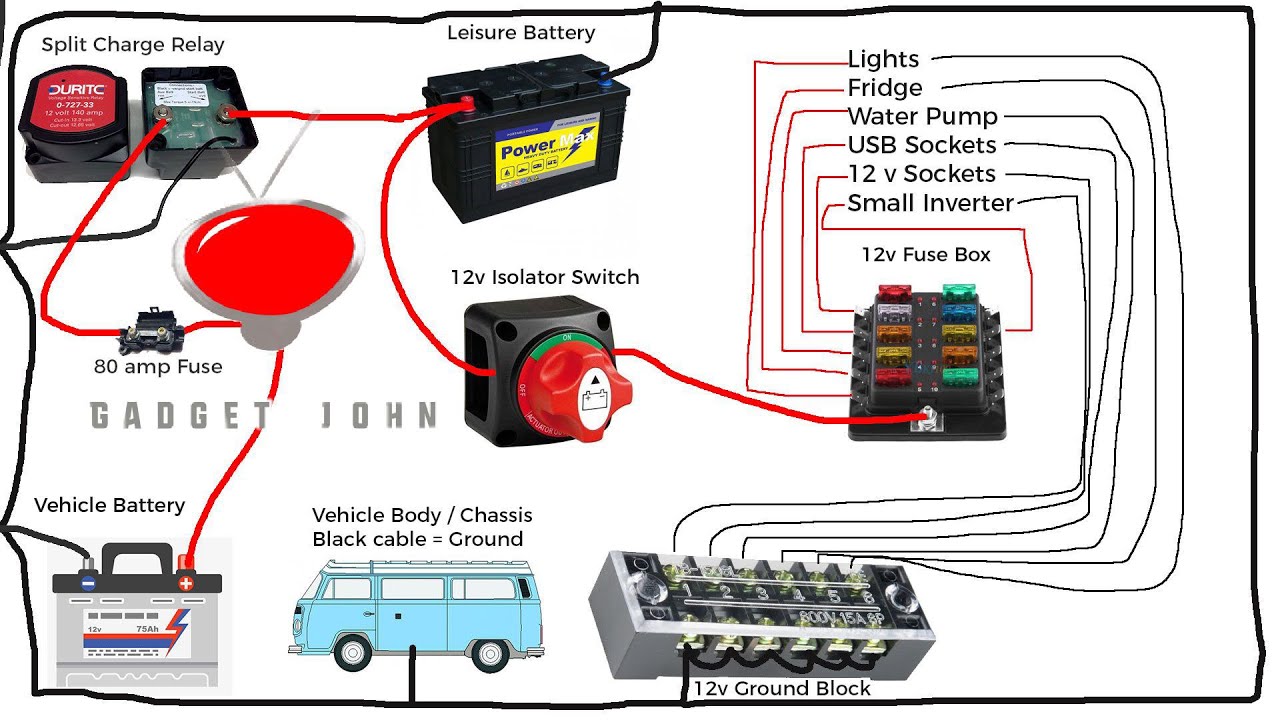
A basic travel trailer battery system typically involves a single 12-volt battery, a battery switch, and the trailer’s 12-volt circuits. Imagine a simple diagram: The battery’s positive (+) terminal connects to the “in” terminal of the battery switch. The switch’s “out” terminal then connects to a positive distribution bus bar. From this bus bar, individual circuits (lights, pumps, etc.) branch off, each with its own fuse or circuit breaker.
The negative (-) terminal of the battery connects directly to the trailer’s chassis, providing a ground path. The negative side of each circuit also connects to the chassis ground. This completes the circuit. Remember, always use appropriately sized wiring and fuses for each circuit.
Complex Travel Trailer Battery System Wiring Diagram with Multiple Batteries
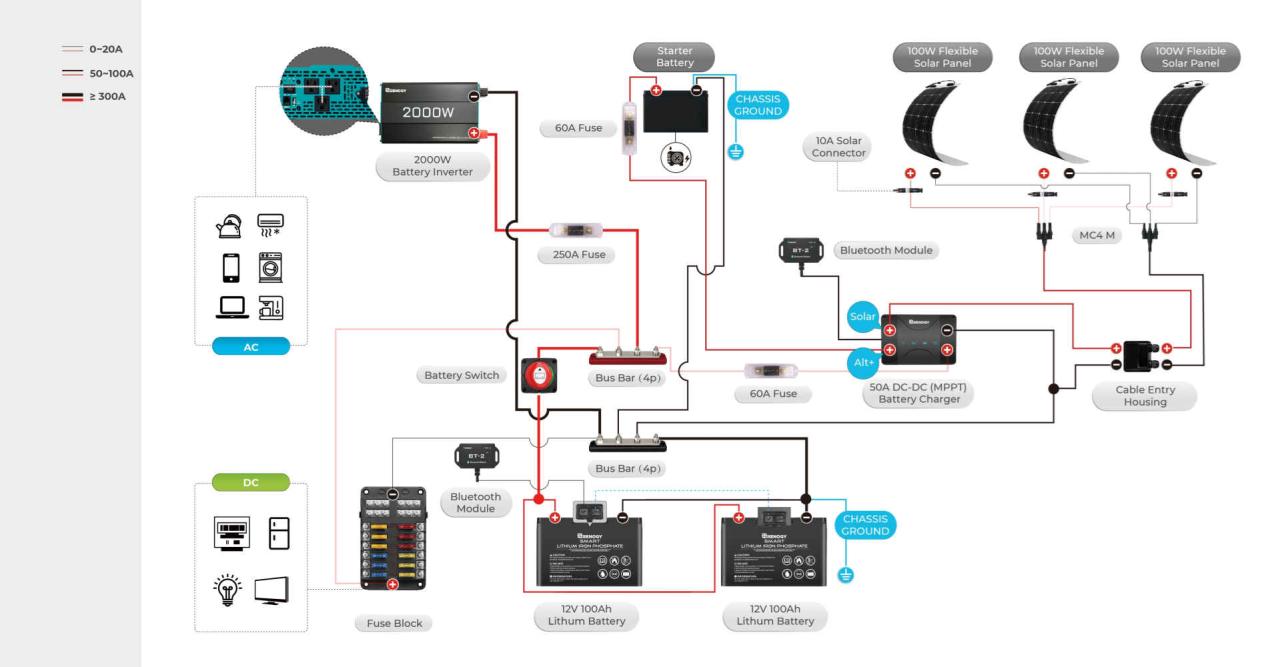
More complex setups might include multiple batteries, perhaps a deep-cycle battery for house power and a starting battery for the tow vehicle’s breakaway system. In this scenario, the battery switch becomes more sophisticated, possibly allowing independent control over different circuits or battery banks. Consider a scenario with two batteries:
| Component | Connection 1 | Connection 2 | Notes |
|---|---|---|---|
| Battery 1 (House) | Positive (+) Terminal | Switch Group 1 “In” | Deep-cycle battery |
| Battery 2 (Starting) | Positive (+) Terminal | Switch Group 2 “In” | Starting battery |
| Battery Switch (Dual Group) | Group 1 “In” (Battery 1) | Group 1 “Out” | Controls house circuits |
| Battery Switch (Dual Group) | Group 2 “In” (Battery 2) | Group 2 “Out” | Controls starting circuits |
| House Circuit Breaker Panel | Switch Group 1 “Out” | Various Circuits (Lights, Pumps, etc.) | Protected by individual breakers |
| Starting Circuit Breaker | Switch Group 2 “Out” | Breakaway System | Protected by its own breaker |
| Chassis Ground | Negative (-) Terminals (Both Batteries) | Various Circuits (Lights, Pumps, etc.) | Common ground for all circuits |
This table illustrates how the battery switch manages the flow of power from each battery to its designated circuits. Each circuit has its own protection (circuit breakers or fuses) for safety. Remember that the negative terminals of both batteries are connected to the chassis ground, creating a complete circuit.
Importance of Understanding Wiring Diagrams
Before undertaking any electrical work on your travel trailer, thoroughly review the wiring diagram. This prevents accidental short circuits, damage to components, and potential safety hazards. Knowing the layout helps you correctly identify wires, troubleshoot malfunctions, and safely install new components. For example, if your interior lights stop working, the wiring diagram will guide you to check the correct fuses, the circuit breaker, and the wiring itself to isolate the problem.
Attempting repairs without a clear understanding of the system can easily lead to more extensive and costly problems.
Battery Switch Upgrades and Replacements
Upgrading your travel trailer’s battery switch can significantly improve convenience and functionality. A simple upgrade can save you time and frustration in the long run, while a more advanced replacement can offer features that enhance your camping experience. This section will explore the benefits of upgrades, guide you through replacing a faulty switch, and compare various upgrade options to help you make an informed decision.
Benefits of Upgrading to a More Advanced Battery Switch
Modern battery switches offer features that go beyond the basic on/off functionality of older models. Remote control switches allow you to manage your battery banks from inside your RV, eliminating the need to crawl under your trailer in inclement weather. Digital displays provide clear visual feedback on battery voltage and status, enabling proactive monitoring of your power system.
This early warning system can prevent unexpected power failures during your trips. Some advanced switches even include features like automatic charging control or low-voltage cutoff protection, enhancing both convenience and safety.
So, you’re an audiophile who travels? Awesome! Check out this guide on building an audiophile travel setup for killer sound on the go. It’s all about lightweight, high-quality gear. But if you prefer something a little more rugged, then maybe audiophile travel aetup suggestions from this other resource might be better suited to your needs.
Remember, portability doesn’t mean sacrificing sound quality! Choose wisely and enjoy the music wherever your adventures take you.
Replacing a Faulty Battery Switch: A Step-by-Step Guide
Replacing a battery switch is a relatively straightforward task, but it’s crucial to disconnect the battery before starting any work to prevent electrical shocks. Always consult your trailer’s wiring diagram to ensure proper connections.
- Disconnect the negative (-) battery cable from your battery bank. This is the most important safety step.
- Carefully remove any access panels or components that obstruct access to the battery switch.
- Identify all wires connected to the switch. Take pictures or make detailed notes of their positions before disconnecting them.
- Disconnect the wires from the old switch, ensuring you note which wire goes to which terminal. Labeling wires with tape and a marker is helpful.
- Remove the old switch from its mounting location. This may involve removing screws or bolts.
- Mount the new switch in the same location as the old one, ensuring it’s securely fastened.
- Reconnect the wires to the new switch, following your notes or pictures carefully. Double-check all connections for accuracy.
- Reconnect the negative (-) battery cable.
- Test the new switch to ensure it functions correctly.
- Reinstall any access panels or components that were removed.
Comparison of Battery Switch Upgrade Options
Choosing the right battery switch depends on your budget, technical skills, and desired features. Here’s a comparison of some common options:
| Switch Type | Cost | Installation Difficulty | Features |
|---|---|---|---|
| Standard Manual Switch | $10 – $50 | Easy | On/Off switching for battery banks |
| Remote Controlled Switch | $50 – $150 | Moderate | Remote on/off switching, potentially with additional features like individual bank control |
| Digital Display Switch | $100 – $300 | Moderate to Difficult | Remote on/off switching, voltage display, low-voltage alerts, and potentially more advanced features. |
| Smart Battery Switch (with Bluetooth/App Control) | $200 – $500+ | Difficult | Remote control via smartphone app, detailed battery monitoring, advanced charging control, and potentially integration with other RV systems. |
Visual Representation of Internal Components
Let’s peer inside a typical battery switch to understand its inner workings. Imagine a compact, robust box, usually made of plastic or metal, designed to withstand vibrations and harsh outdoor conditions. Within this box lies the heart of the switch – a sophisticated mechanism responsible for controlling the flow of high current.The switch’s core consists of several key components working in concert.
Heavy-duty copper contacts, often plated with silver for better conductivity and corrosion resistance, form the primary connection points. These contacts are meticulously crafted to ensure a secure and reliable connection with the battery terminals. A sturdy, insulated lever or rotary mechanism is linked to these contacts, acting as the control element. This mechanism physically moves the contacts, either connecting them to establish a circuit or separating them to break the circuit, effectively switching the power on or off.
Thick copper bus bars, often seen in larger switches, provide a low-resistance pathway for the substantial current flowing through the device. Finally, robust terminals, usually made of brass or copper, securely connect the switch to the battery and the trailer’s electrical system.
Internal Component Interactions
The interaction between these components is elegantly simple yet highly effective. When the switch is in the “ON” position, the lever or rotary mechanism aligns the copper contacts, creating a direct electrical pathway. This allows current to flow freely from the battery to the trailer’s electrical system. Conversely, in the “OFF” position, the mechanism separates the contacts, interrupting the electrical pathway and completely cutting off the power flow.
This precise movement ensures a clean break, preventing arcing and protecting both the battery and the electrical system. The smooth operation of the lever or rotary mechanism is crucial; it ensures the contacts engage and disengage reliably without causing damage.
Material Composition and Impact, Battery switch on travel trailer function
The materials used in a battery switch directly impact its performance and lifespan. The choice of copper for contacts and bus bars is crucial because of its excellent conductivity and relatively low resistance. Silver plating enhances this conductivity further, while also providing superior corrosion resistance, essential in preventing degradation over time and ensuring consistent performance in diverse environmental conditions.
The insulating materials surrounding the contacts and mechanism are selected for their high dielectric strength and resistance to heat and chemicals, preventing short circuits and ensuring long-term reliability. The housing material, often a durable plastic or metal, provides protection against impact, moisture, and vibration. The overall construction quality of the switch is vital, ensuring the integrity of its internal components and guaranteeing its longevity.
A well-constructed switch, made from high-quality materials, can reliably handle high currents for many years, while a poorly constructed one may overheat, fail prematurely, or even pose a safety hazard.
Mastering your travel trailer’s battery switch is about more than just flipping a switch; it’s about understanding your RV’s electrical system and ensuring safe and reliable power. From choosing the right switch type to performing basic maintenance, this guide has provided you with the essential knowledge to confidently handle your trailer’s power needs. Remember to always prioritize safety, and don’t hesitate to consult a professional if you encounter any issues you can’t resolve.
Happy travels!
FAQ Summary: Battery Switch On Travel Trailer Function
What happens if I leave my battery switch on all the time?
Leaving your battery switch on constantly can drain your batteries, especially if you’re not connected to shore power. This can lead to dead batteries and potentially damage to your electrical system.
How often should I check my battery switch?
Regularly inspecting your battery switch for corrosion, loose connections, and proper operation is recommended. A visual check every few months is a good practice.
Can I use a different type of battery switch than what came with my trailer?
You can upgrade or replace your battery switch, but ensure the new switch has the correct amperage rating and is compatible with your trailer’s electrical system. Consult a professional if you’re unsure.
My battery switch is making a clicking sound. What’s wrong?
A clicking sound could indicate a faulty switch, a low battery, or a problem in the wiring. Check your battery voltage and wiring connections before replacing the switch.
